 Back to guides
Onfido Studio
What is Onfido Studio?
Onfido Studio is a tool for building, managing, and deploying identity verification journeys. Build workflows visually using our no-code Workflow Builder tool, in a format similar to flow charts or process diagrams.
Onfido Studio offers a number of benefits including:
- Automated, smart decision making through no-code workflows
- Customized and flexible user verification flows
- Scalability to new markets and user requirements
Onfido Studio's main components are: The Workflow Builder, Workflows, Workflow Runs, Smart Capture and our Verification Suite.
The Workflow Builder
The Workflow Builder is the interface for creating and managing workflows, available directly through the Onfido Dashboard. It's a no-code, drag and drop interface that allows you to build, maintain and update workflows seamlessly without the need for developer involvement.
Workflows
Workflows are dynamic end-user verification journeys based on the rules defined using the Workflow Builder. Workflows can be created and implemented in minutes, and they integrate directly with our SDKs to determine the required user flow.
You can create multiple workflows that can be used individually or in parallel for a range of use cases. For example, routing different user groups and geographies or setting up step-up verification. The workflow allows you to control an end user's journey based on information you capture throughout the verification process.
Workflows allow you to define required end-user actions, which verifications are triggered as well as logic and conditions to create fully customized verification flows. Workflows contain a number of configuration options, including adding custom inputs and retry logic for when an end user fails on the first verification attempt.

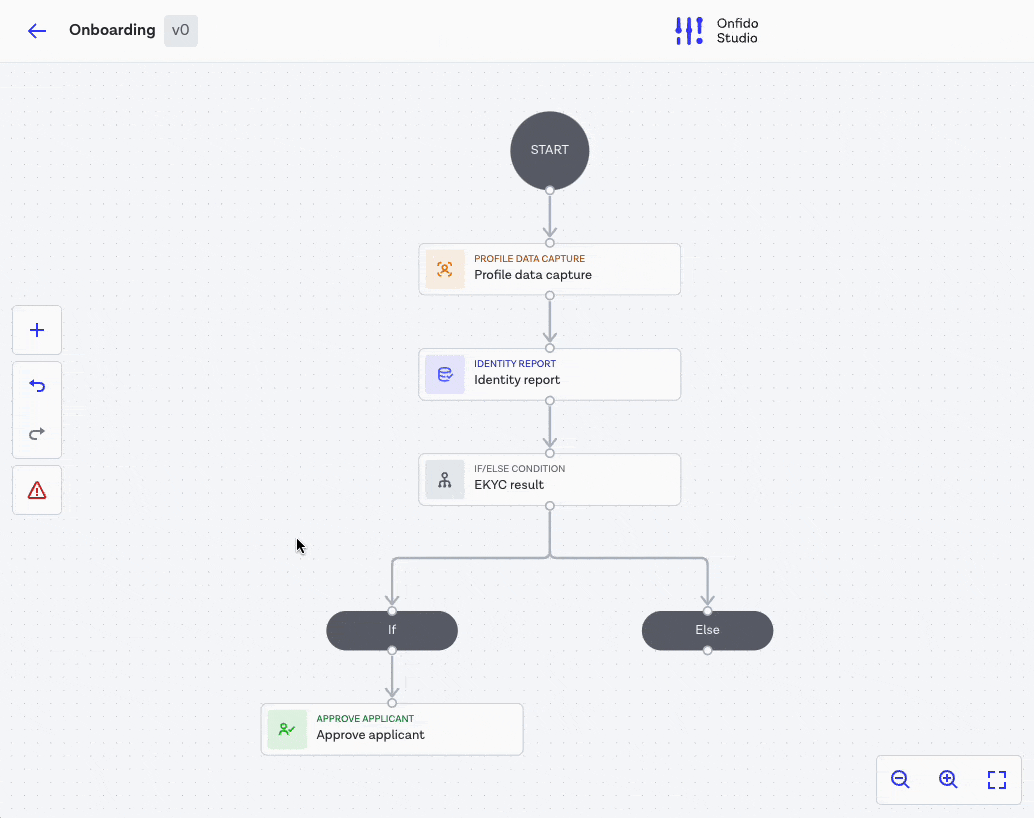
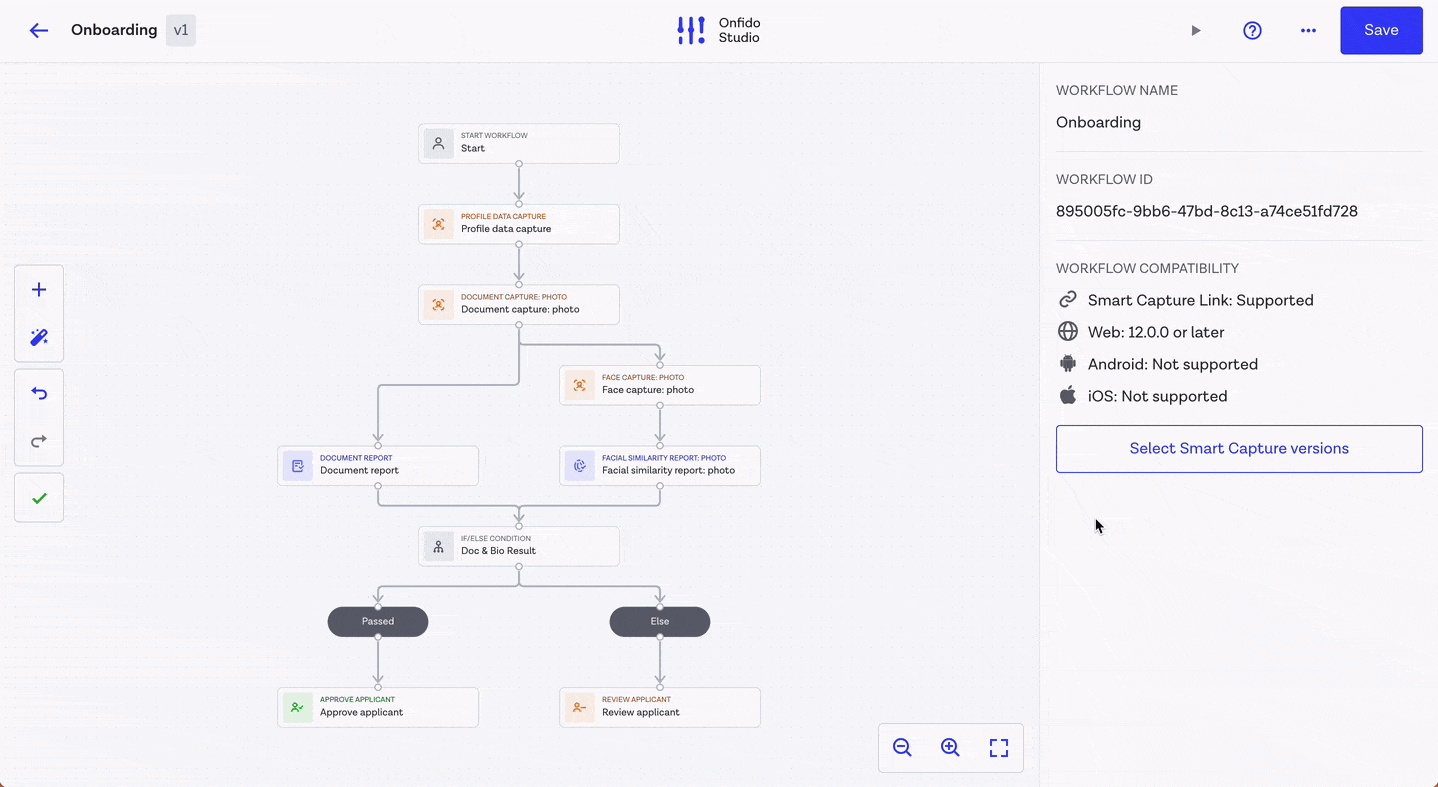
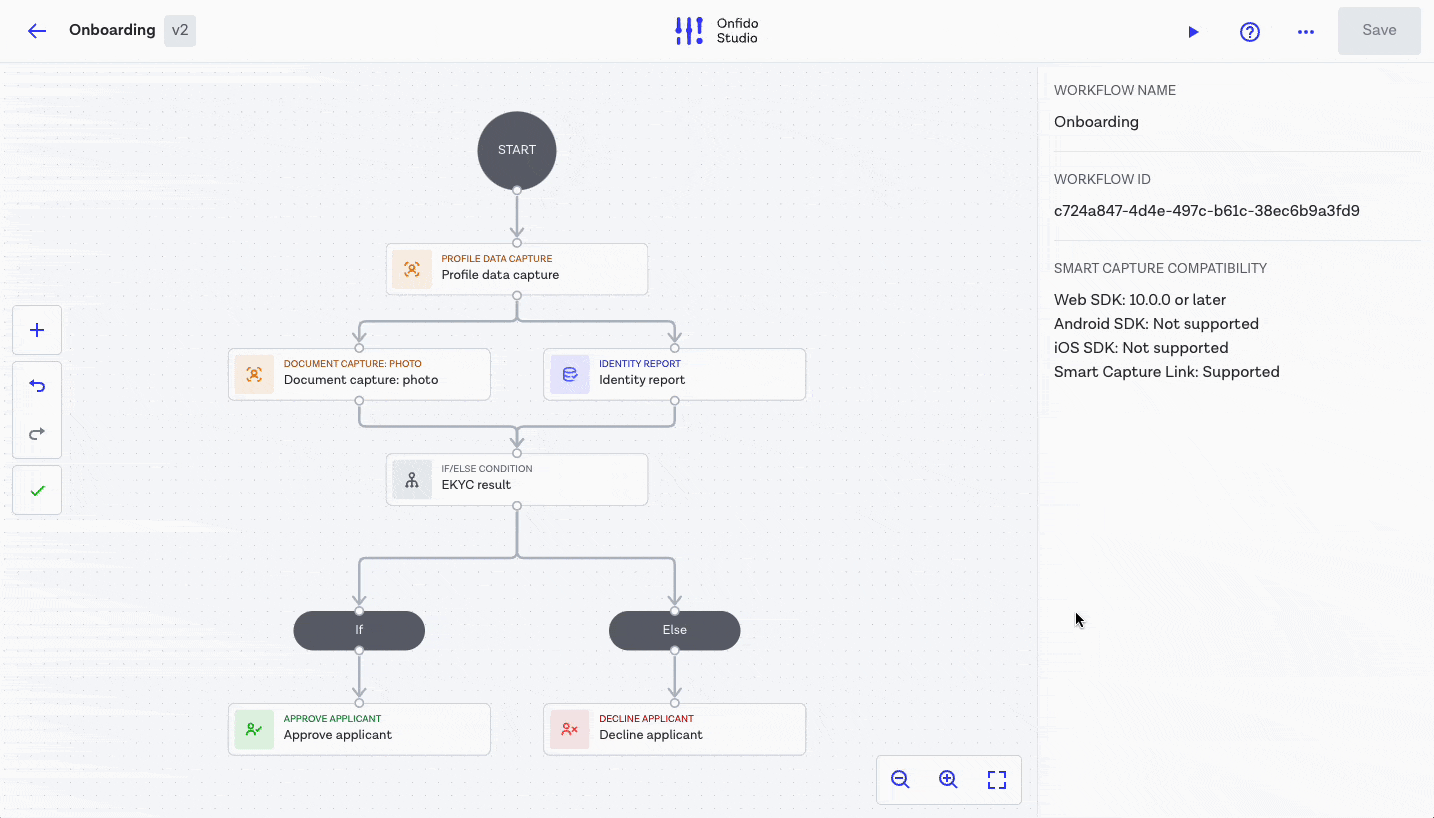
An example of a simple workflow
Workflow Runs
Workflow Runs are individual instances of a workflow, requiring input data to execute. Data can either be provided through an Applicant object and/or through a Custom Input Data object.
Workflow runs can only be executed on valid, activated workflows. More information about workflow versioning can be found below, while more details regarding creating workflow runs can be found on our API reference.
Verification Suite
The Onfido Verification Suite is a curated library of verification methods, from award-winning document and biometric verification solutions, through to data verifications and fraud detection signals. With Onfido Studio, you can seamlessly integrate different verification methods in a single workflow.
New verification signals and configurations can be added to an existing workflow by dragging and dropping these tasks into the Workflow Builder and activating it. Every time the workflow is called from then on, the active version will be used.
Learn more about activating workflows here and about all our verification products here.
Smart Capture SDK
Onfido's Smart Capture SDK manages the end-user experience, communicating directly and dynamically with active workflows to ensure the correct capture and upload of user information. It supports all available verifications as well as additional configuration options, such as enabling NFC and a customizable welcome screen.
Studio is available via our iOS, Android, React Native and Web SDKs.
To help you get integrated quickly, Onfido can host your workflow directly using Smart Capture Link. Unique or generic URLs can be generated which will direct your end users to a specific, active workflow version.
Note: Be sure that the version of the SDK you are using is compatible with the tasks you are adding to the workflow. You can check this by clicking anywhere on the Workflow Builder canvas.
Building your workflow
Onfido Studio is a tool for building, managing, and deploying identity verification journeys. Build flows visually using our no-code Studio Builder tool, in a format similar to flow charts or process diagrams. You can navigate directly to Studio via the Onfido Dashboard. To begin with, you will see the workflow list view where you can either navigate to an established workflow or create a new workflow.
Note: Studio must be enabled on your Dashboard account. If you do not see this, please contact your Onfido representative or you can sign up for a free trial here.
Note: When integrating with Smart Capture Link, please name your workflow to be client facing friendly as it will appear as the title in the browser tab.
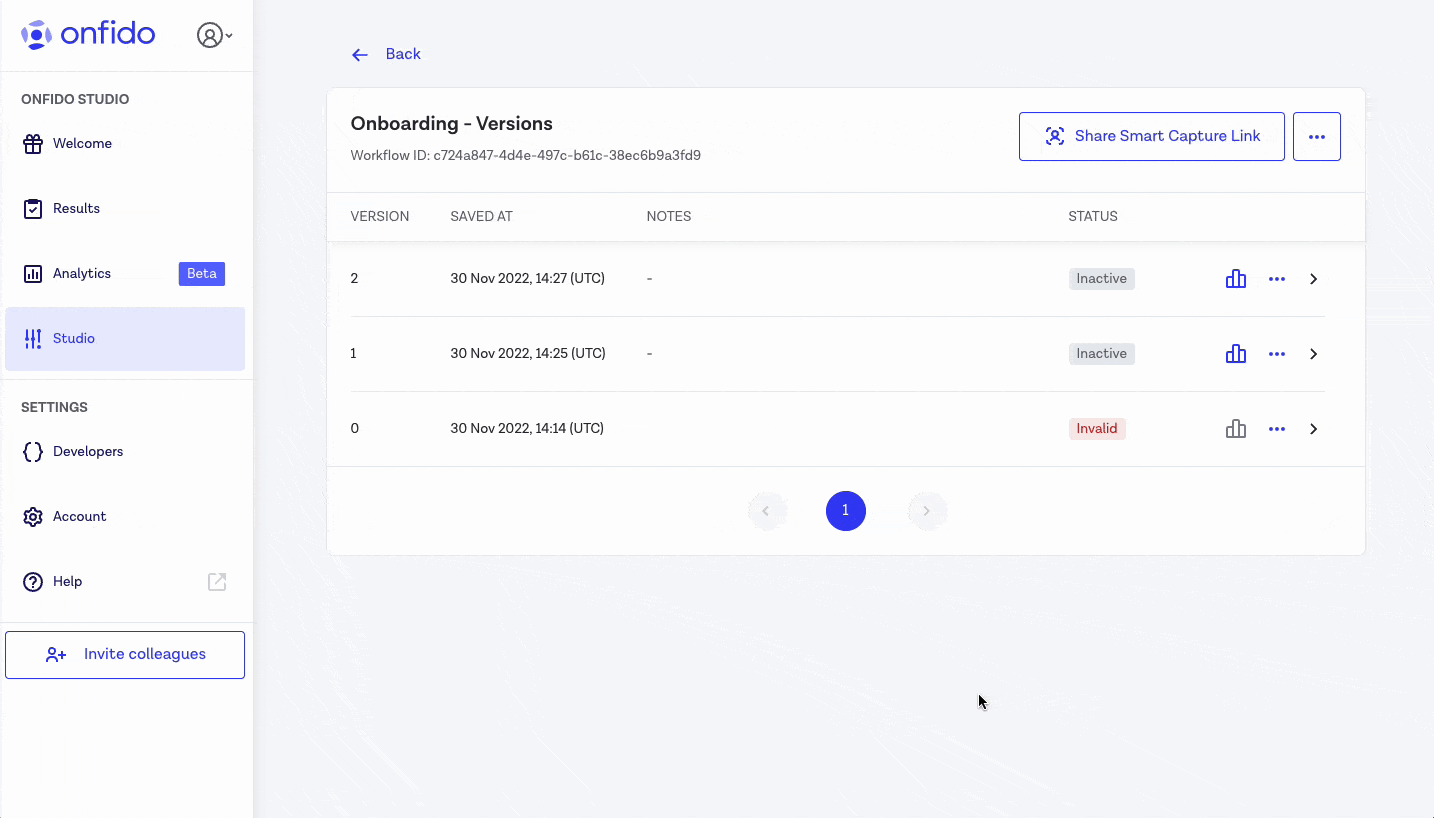
Workflow versions and activation
Each time a workflow is created and subsequently saved, a new version of the workflow is generated and the version number will be incremented. During each save you will be asked to add notes. Although not mandatory, these can be useful when testing different versions or making incremental changes.
There are three statuses of workflow version:
- Active - indicating the live version. When this workflow ID is used, the workflow runs will be executed against this version.
- Invalid - indicating there are issues preventing this version from being able to execute. Invalid workflows cannot be activated, all issues will need to be resolved in a new version before being able to activate.
- Inactive - indicating that the workflow is valid but no live workflow runs are able to be run through this flow.
Note: Invalid and inactive versions of the workflow can be archived.
Once you have created a valid version of your workflow, navigate to the workflow versions page and select the settings to activate the version. If you have a live integration, all new workflow runs will use this active version. Upon activation, you will be presented with the minimum SDK requirements to support this version of the workflow.
Activating a workflow version
Workflow templates
Onfido has created a collection of standard templated workflows. These can be used to get started quickly, and easily adapted based on your company's specific verification requirements. The templates will be presented to you the first time you create a workflow, or you can access them through the settings menu directly on the Workflow Builder.

An example workflow template
Tasks
What are tasks?
Tasks are the individual components that make up a workflow, representing the steps an end user will be taken through during the verification journey. These include Smart Capture tasks, Verification tasks (Document, Biometrics, Database, Fraud and Verification), Logic tasks, Actions tasks and Result tasks.
Each individual task has a default task timeout, which is the length of time that the task will wait to be completed before cancelling, thus causing the overall workflow to cancel. If an interactive task times out, the workflow status registers as "abandoned", while non-interactive task timeouts trigger an "error" status.
Smart Capture tasks
Smart Capture or interactive tasks control the Onfido SDK directly and capture information from the end user. There are currently five interactive tasks available through Studio:
- Document Capture
- Face Capture: Photo
- Face Capture: Video
- Face capture: Motion
- Profile Data Capture
- Proof of Address Capture
- Qualified Electronic Signature Capture
- One-time Password Capture
Document Capture task
When triggered in a workflow, the Document Capture task will take the end user through selecting the issuing country, the document type and submitting a valid photo of their document.
Document Capture can be configured to only present certain document types and selected countries to end users. This configuration can be accessed by selecting the task and configuring the document type in the right hand panel of the Workflow Builder.
Configuration:
- Select which document types and countries you want to display to the end user
- Enable / disable NFC
- Enable / disable forceCrossDevice flow for the Web SDK
- Set the length of time the task should await input from the user before timing out
Note: While this configuration helps inform end users of what's accepted, end users are still known to ignore this and upload different documents. We recommend setting up a retry task to inform and remind end users of the documents that are accepted. Be sure to configure your workflow so that ultimately only accepted documents are processed and that all other document types are rejected.
Face Capture: Photo task
A Face Capture Photo task will guide the end user through uploading a selfie. Live photo selfies are commonly combined with document uploads, so that Onfido can confirm the end user is the owner of the document in question. It should be noted that Face Capture Photo tasks will only capture the photo for liveness checks, the Facial Similarity report will need to be run separately.
Configuration:
- You can choose to streamline the end-user journey by disabling the introduction screen
- Set the length of time the task should await input from the user before timing out
Face Capture: Video task
A Face Capture Video task will guide the end user through uploading a video for a liveness check. Live video selfies are commonly combined with document uploads, so that Onfido can confirm the end user is the owner of the document in question. It should be noted that Face Capture Video tasks will only capture the video for liveness checks, the Facial Similarity report will need to be run separately.
Configuration:
- You can choose to streamline the end-user journey by disabling the introduction screen and confirmation video preview
- Set the length of time the task should await input from the user before timing out
Face Capture: Motion task
A Face Capture Motion task will guide the end user through uploading a Motion capture for a liveness check, where the user will be asked to perform a simple headturn movement. Motion captures are commonly combined with document uploads, so that Onfido can confirm the end user is the owner of the document in question. It should be noted that Face Capture Motion tasks will only perform the biometric capture, the Facial Similarity report will need to be run separately.
Configuration:
- You can choose to enable background audio recording during the Motion flow
- Set the length of time the task should await input from the user before timing out
Please note that Motion may not be supported on lower-end devices due to limited device capabilities and/or OS requirements.
To compensate for this, you can create a workflow that automatically falls back to Face Capture Photo or Face Capture Video for users on unsupported devices
Below is an example workflow containing a Document Report and a Facial Similarity Report (Motion), with a fallback to the Facial Similarity Report (Photo) for devices where Motion doesn't run.

The if/else condition that verifies if Motion is supported checks whether the Motion Capture task returns an empty array. An empty array means that Motion is not supported on the user device, while a non-empty array means that Motion is supported on the user device. See the screenshot below for an example task configuration.

Please note that you can also create a workflow with Face Capture Motion and without the Photo or Video fallback as you can see in the example workflow below. However, in this case, if the end user has a device where Motion doesn't run, they will not automatically fallback to Photo or Video. The result of the Face Capture Motion task will be empty and the workflow execution will proceed to the next task which in this example means that the user will be rejected.

Profile Data Capture task
The Profile Data Capture task is designed to support an end-to-end onboarding experience. Customers can add this task to their workflow in order to collect basic end-user profile information that can be then used in reports. For example, customers can collect name, date of birth and address details which can be mapped as inputs for Onfido's Identity Enhanced report.
For country specific profile data, such as Social Security Number (US residents) or Permanent Account Number (Indian residents), these fields will only be displayed if the end user selected the relevant country of residence.
There are a number of profile data attributes that require consent to be collected from a user. Consent will be collected when Social Security Number and Mobile phone number attributes are enabled.
You can include multiple Profile Data Capture tasks across multiple routes in your workflow. This means that you can capture end-user data progressively, while also ensuring only clients from a relevant region (US or Indian residents) are asked for data consent.
Configuration:
- Set the length of time the task should await input from the user before timing out
Note: Our Profile Data Capture task is only web compatible.
Proof Of Address Capture task
The Proof of Address Capture task will guide the end user through taking a picture of a supported document, such as a bank statement or utility bill. The capture step is separate from the report. You can find out more here.
Qualified Electronic Signature Capture Task
When triggered in a workflow, the Qualified Electronic Signature Capture task will guide the user through two QES specific tasks:
- accepting the Trust Services Contract and
- electronically signing one or more documents as part of the onboarding process (i.e, bank account terms and conditions)
Qualified Electronic Signature Capture requires two input parameters:
-
Country of operations: an ISO alpha-3 country code specifying the country where your business activities are directed. This parameter is used to localize the Trust Services Contract for the qualified certificate issuance process and set the language for the Trust Services Contract (local language only supported). Supported countries of operation are:
- Belgium (BEL)
- Bulgaria (BGR)
- Croatia (HRV)
- Czech Republic (CZE)
- France (FRA)
- Germany (DEU)
- Greece (GRC)
- Hungary (HUN)
- Italy (ITA)
- Netherlands (NLD)
- Poland (POL)
- Portugal (PRT)
- Romania (ROU)
- Slovenia (SVN)
- Spain (ESP)
- United Kingdom (GBR)
- Document to sign URL: the URL to access the document to sign.
Note: This URL needs to be public and accessible without authentication. If a document to sign contains sensitive data, clients should consider generating a temporary unique URL per workflow run for data privacy consideration.
Language configuration
There are three configuration parameters that have a direct impact on the Qualified Electronic Signature capture task interface language:
- The SDK initialization language parameter, which determines the language of SDK text. You can find more information in our Web, iOS and Android reference documentation
-
The two Qualified Electronic Signature capture task input parameters:
- Country of operation: this parameter sets the user acceptance screen texts for checks boxes, the Namirial application form, the Namirial terms and conditions and the Namirial privacy notice
- Document to sign URL: this parameter indirectly sets the language of the document to sign
It is your responsibility to ensure these parameters are aligned to provide a unified language experience to the user.
One-time Password Capture task
One-time Password verifies that a user is in possession of the phone number, by sending a unique code to their phone for validation.
One-time Password Capture has one optional input parameter:
- Phone Number: the initial phone number can be pre-populated, and can then be confirmed by the user before requesting the code to be sent.
Verification tasks
Workflows can incorporate the complete library of verifications that Onfido offers to verify identities, catch sophisticated fraud attacks and address compliance needs. This suite of verification tasks includes Document, Biometric, Database, Fraud and Verification signals.

Onfido Studio's verification tasks
Autofill task
Autofill is a fully automated data extraction task, pulling data from documents uploaded by an end user and immediately returning the document information for use in a workflow. Supporting more than 1800 documents, this optical character recognition (OCR) solution can be used to automatically prefill sign-up forms, verify extracted data against databases and automatically classify documents.
Autofill is dependent on the data it extracts from a document. As such, an Autofill task must always be included along a route that follows a Document Capture task.
Note: Autofill data extraction is done on a best-effort basis. Because information varies across different documents, none of these properties are guaranteed to be present in the response and therefore should not be used as input for Logic task conditions.
Document Report task
The Document Report task is composed of data integrity and visual authenticity checks. It checks the internal and external consistency of the document uploaded by the end user during the workflow to identify potential discrepancies. Onfido also offers two specialized Document Report tasks: document report with address information and document report with driving licence information.
A Document Capture task must always be executed prior to the execution of the Document Report task in order to extract the appropriate task input data.
Configuration
The Document Report task offers several configuration options that directly impact the results of the Document Report. These include:
- Supported Documents
Supported Documents
The Supported Documents feature lets you specify which documents you want to accept in your verification workflow, filtering according to issuing country and document type. When an applicant submits a restricted document (i.e. a document not included in your supported documents), the Supported document breakdown will flag as consider, producing a sub-result of reject.
The Supported Documents configuration exists on both the document capture and the document report tasks. By default, the document report task will inherit the configuration from the document capture task, to ensure the documents presented to the applicant in the SDK are the same as those allowed to clear the Document Report. If needed, this inheritance can be ignored by selecting ‘custom’ in the three dots menu.
If there are multiple document capture tasks feeding into one document report task, the report task will inherit and combine all of the supported document configurations feeding into it.
Note: For customers with dual Classic and Studio accounts, the Supported Documents configuration in your workflow will take precedence over the account-level supported documents configuration (Onfido Classic). Look for the Onfido Classic section in the Dashboard navigation sidebar to check whether you have a dual account.
Facial Similarity Report task
Facial Similarity Reports are designed to compare the most recent photo or video provided by the end user to the face on documents uploaded to the workflow. The purpose of these tasks are to prove document ownership. Onfido offers four types of Facial similarity report: Photo, Photo Fully Auto, Video and Motion.
A Facial Similarity Report task must always follow the route of a Document Capture task and a Face Capture task in order to extract the appropriate task input data to make the comparison.
Driver's Licence Data Verification task
The Driver's Licence Data Verification Report verifies the authenticity of an end user's uploaded document by comparing it against US state driver's licence databases.
Input data for this task can be drawn from the workflow input data, as well as information extracted from a Document Capture task.
Identity Report task
An Identity Report task validates an applicant's address, date of birth, name and mortality (where applicable) by cross-referencing their details against a range of verified databases. For end users in the United States, the report can also optionally match the Social Security Number, passed in via the workflow input data, or extracted from a Profile Data Capture task.
Input data for this task can be drawn from the workflow input data, a Document Report or Autofill task, as well as information extracted from a Profile Data Capture task.
Watchlist Report task
Watchlist Reports allow you to verify your users' records on global watchlists, including sanctions, politically exposed persons, monitored lists, terrorism, money laundering and most wanted lists and adverse media (available only for Watchlist AML reports) . Currently Onfido Studio supports our standard and AML watchlist products.
Input data for this task can be drawn from the workflow input data, a Document Report or Autofill task, as well as information extracted from a Profile Data Capture task.
Known Faces Report task
The Known Faces Report compares an end user's likeness in their uploaded live photo or live video to live photos and live videos with the applicant's record in your Onfido account database. It alerts you to faces which have already been through your identity verification flow, so you can catch repeat identity fraud attempts, and help users who may have forgotten they already registered with you to recover their accounts.
A Known Faces Report task must always follow the route of a Face Capture task in order to extract the appropriate task input data to make the comparison.
Device Intelligence Report task
The Device Intelligence Report task is a passive verification signal that assesses non-document and non-biometric signals to capture sophisticated fraud.
Although the Device Intelligence task can be run as a standalone report, it's recommended you combine it with a Document or Facial Similarity Report in the workflow.
This task is only compatible with reports requiring a media upload (document, photo or video) because the workflow collects device integrity information. As such, an Device Intelligence Report must always follow the route of a Document Capture task or a Face Capture task in order to extract the appropriate input data.
India Tax ID Report task
The India Tax ID Report validates an end user's Indian Permanent Account Number (PAN) by matching it to official records held by the Indian government.
Input data for this task can be drawn from the workflow input data, as well as a Profile Data Capture task.
Proof Of address Report task
The Proof of Address Report reviews any uploaded documents to verify an end user's address. The task checks whether information provided by the applicant matches that on the proof of address document, in addition to asserting whether the document is supported and has a valid date of issue.
Input data for this task can be drawn from the workflow input data, a Document Report, an Autofill task or Proof of Address task, as well as a Profile Data Capture task.
Watchlist Ongoing Monitoring task
Watchlist Ongoing Monitoring allows you to create a monitor to verify and continuously be updated about your users' records on global watchlists, including sanctions, politically exposed persons, monitored lists, terrorism, money laundering, most wanted and adverse media (available only for Watchlist AML reports). Currently Onfido Studio supports our standard and AML Watchlist Ongoing Monitoring products.
Input data for this task can be drawn from the workflow input data, a Document Report or Autofill task, as well as information extracted from a Profile Data Capture task.
This task's output doesn't include the associated watchlist report results. Hence, if you have logic that depends on them, we recommend adding a Watchlist Report task to your workflow, then add this task to get updates if the user's records changed.
You can also view the list of your monitored users and history of updates in their records by clicking on the Ongoing monitoring tab in left hand menu of your Studio Dashboard.
Qualified Electronic Signature Task
The Qualified Electronic Signature verification task is composed of qualified certificate issuance and PDF document signature. To issue a qualified certificate, a successful identity verification of the user (certificate holder) is required.
One-time Password task
The One-time Password verification task records the outcome of the verification (clear or consider), as well as the related breakdowns and properties.
A One-time Password Capture task must always be executed prior to the execution of the One-time Password task.
Logic tasks
Logic tasks are one of the most powerful aspects of Onfido Studio, allowing you not only to control your end user's verification experience, but also to define which reports will be run on specific users, based on the information captured in the workflow and the results of verification tasks.
The conditions of a Logic task can be configured based on the workflow input data that directly feeds into it. This can either be applicant or custom data, as well as all attributes of all preceding tasks along the route. Conditions can handle dates, which are useful for age verification and expiry date checks.
You can define as many output routes (or conditions) from a single Logic task as you wish. Conditions will execute top to bottom, based on their order in the right hand configuration panel. You may find it useful to place these conditions from left to right on the Workflow Builder to match this order, for ease of use and understanding. The condition order can be adjusted by dragging a condition up or down in the right hand configuration panel.
The first condition that is evaluated as true will channel the end user through that route of the workflow. A single condition can be met in multiple ways by using AND and OR logic statements. If no logic condition is met, then the routes defined as "else" will be taken.
The Logic tasks themselves, as well as the routes that proceed from them, can all be named in the configuration panel for ease of use and understanding.

Naming logic tasks and conditions can be incredibly useful when designing workflows
It can be useful to place a Logic task immediately after the workflow's start task, to filter users via specific routes based on workflow input data. For example, you may wish to define different verification routes based on country of residence, data which you have collected before you start your workflow.
Action tasks
Retry task
The Retry task allows you to inform the end user of potential mistakes they have made during the verification process, asking them to retry the previous step. For example, they might have uploaded an incorrect or expired document. The Retry task is most commonly related to an Autofill task, with the retry based on data that has been extracted from the documents provided by the user. If any errors are found, the workflow will loop back to the point where the user can resubmit their document.
The advantage of the Retry task is that end users can be informed of errors while they are still active in the journey.
From a workflow perspective, a Retry task should always immediately follow a Logic task in order to determine what specific issue has occurred. For example, has the document expired? If yes, the retry is triggered.
In the right hand configuration panel of the Workflow Builder, you can designate the reasons that trigger the retry. You can choose from a range of standard reasons (Generic document issue, Unaccepted document, Expired document, Generic selfie issue), or customize your own reasons by setting the title (e.g. Your document has expired), description for the end user (e.g. Please try again with a valid document) and the button text (e.g. Try again).
Note: Customized retry reasons are only available in US English, translation support will be delivered separately.
Customers can also configure the number of times a user will be permitted to resubmit (the maximum number of retries is three). After the maximum number of retries, a user will be routed along the limit reached route. At this point, you can choose to either stop the user from proceeding, or allow them to continue in order to collect all the information you need to conduct your review.

Adding a retry allows a user to correct an error while still active in the workflow
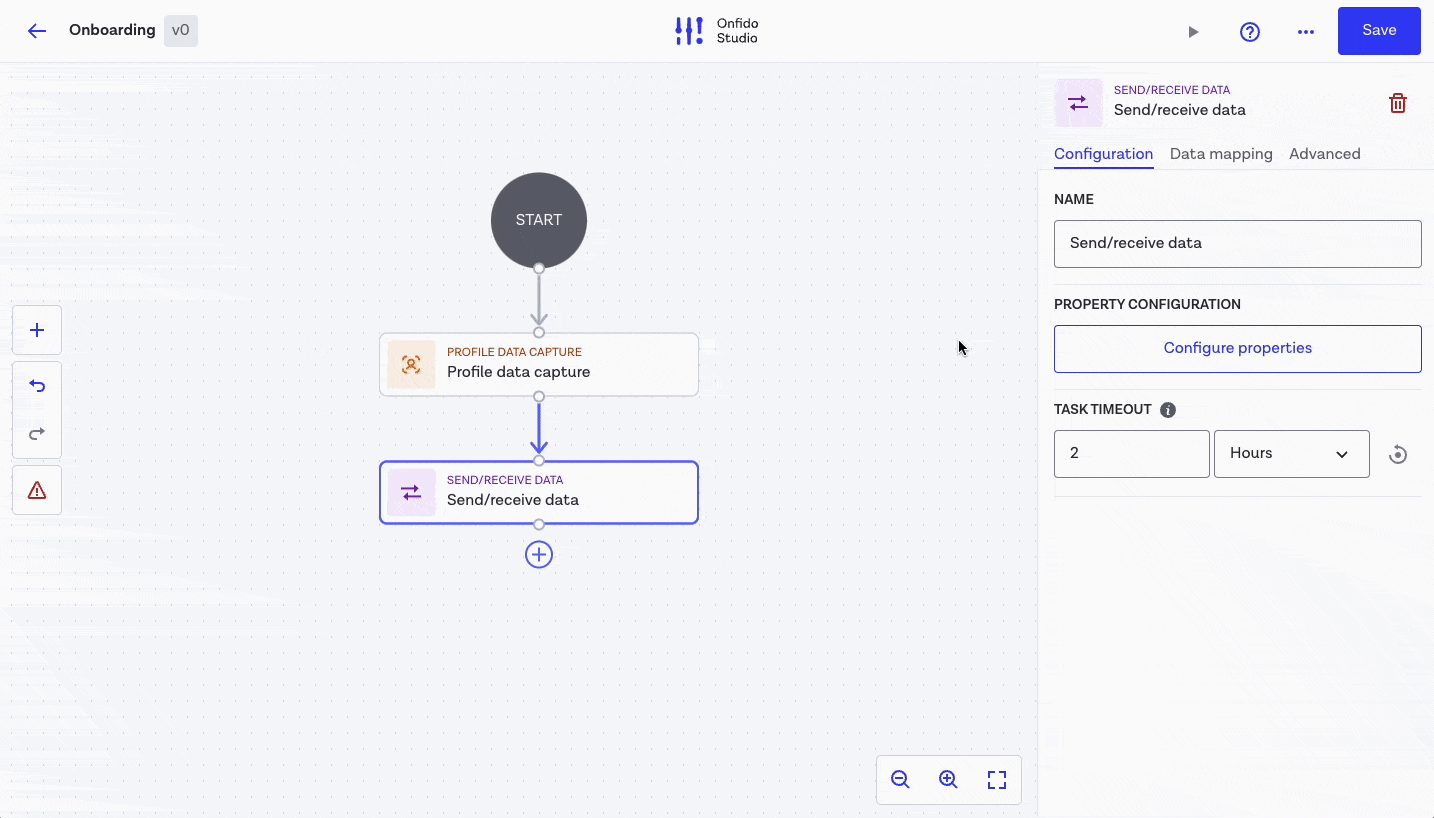
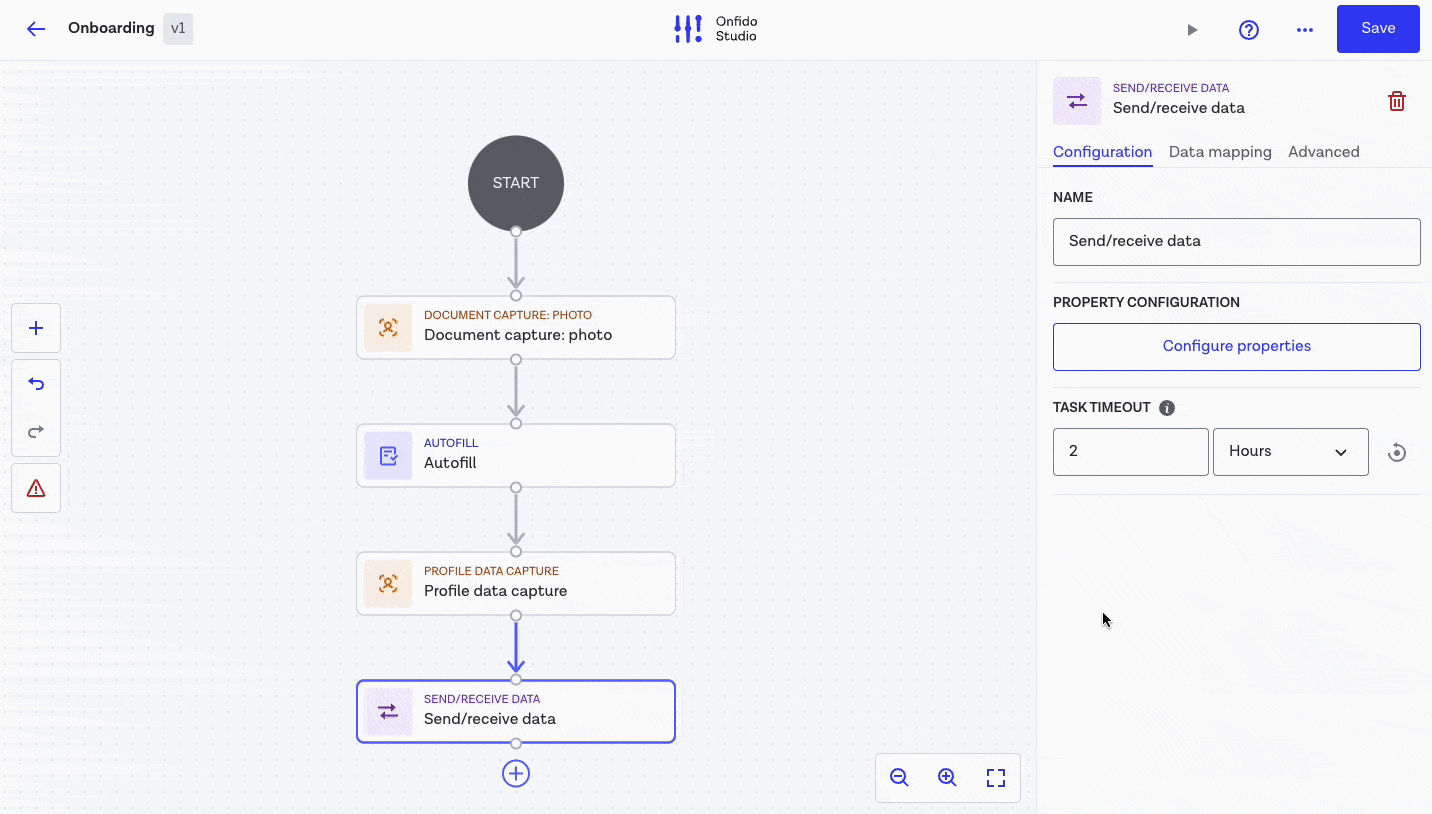
Send/Receive Data tasks
Send/Receive Data tasks optionally allow you to pass data in and out mid-workflow, rather than just at the start via Workflow inputs or at the end via Workflow outputs. One or more Send/Receive Data tasks can be placed at any point in a workflow and can send data from any reports or workflow tasks run to your system. For example, if you intend to use the data extracted via our Autofill product to populate an end-user form, you can have your user complete a Document Capture task, then run the Autofill report before configuring a Send/Receive task to extract and send the data to your system via a webhook.
Send/Receive tasks can also be configured to receive results back from your system, to be used when building the conditions of Logic tasks or as inputs for other tasks. For example, if you extract information to your own internal system (possibly to calculate a risk score or create an account type), your processed data can be sent back into the workflow and used to control the verification route.
There are four main steps to setting up a Send/Receive Data task in your workflow:
Configure your Send Data
Send Data is configured in much the same way as Workflow input data. Custom send properties can be defined with a property name and a data format (such as string, number, boolean, etc) in the Workflow Builder. You can also define semantic types to annotate custom send properties, so that any task that accepts this data as input can receive it via your integration.
Additionally, you can configure the name of the Send/Receive Data task, as well as designating a task definition ID and a task definition version. The task definition ID is a unique name assigned to a Send/Receive Data task to properly identify it and ensure its correct integration. Task definition versions allow you to maintain multiple versions of a single Send/Receive Data task to cater for updates, with different processing logic applied to different versions, depending on your needs. Both the task definition ID and task definition version are included in the payload of the workflow_task.started webhook (more details regarding webhooks can be found below).
Map your data sources
Custom send properties then need to be mapped to the specific sources they are drawn from in the workflow. For example, applicant information you wish to extract and process (such as first name, last name, date of birth, address, etc) could be mapped to a Profile Data Capture task.
Configure your Receive Data
When configuring your custom send properties, it's important to pay close attention to the format of the output schema. Any data passed back into a workflow (the receive data) must match this designated format (see below for more details on data validation).
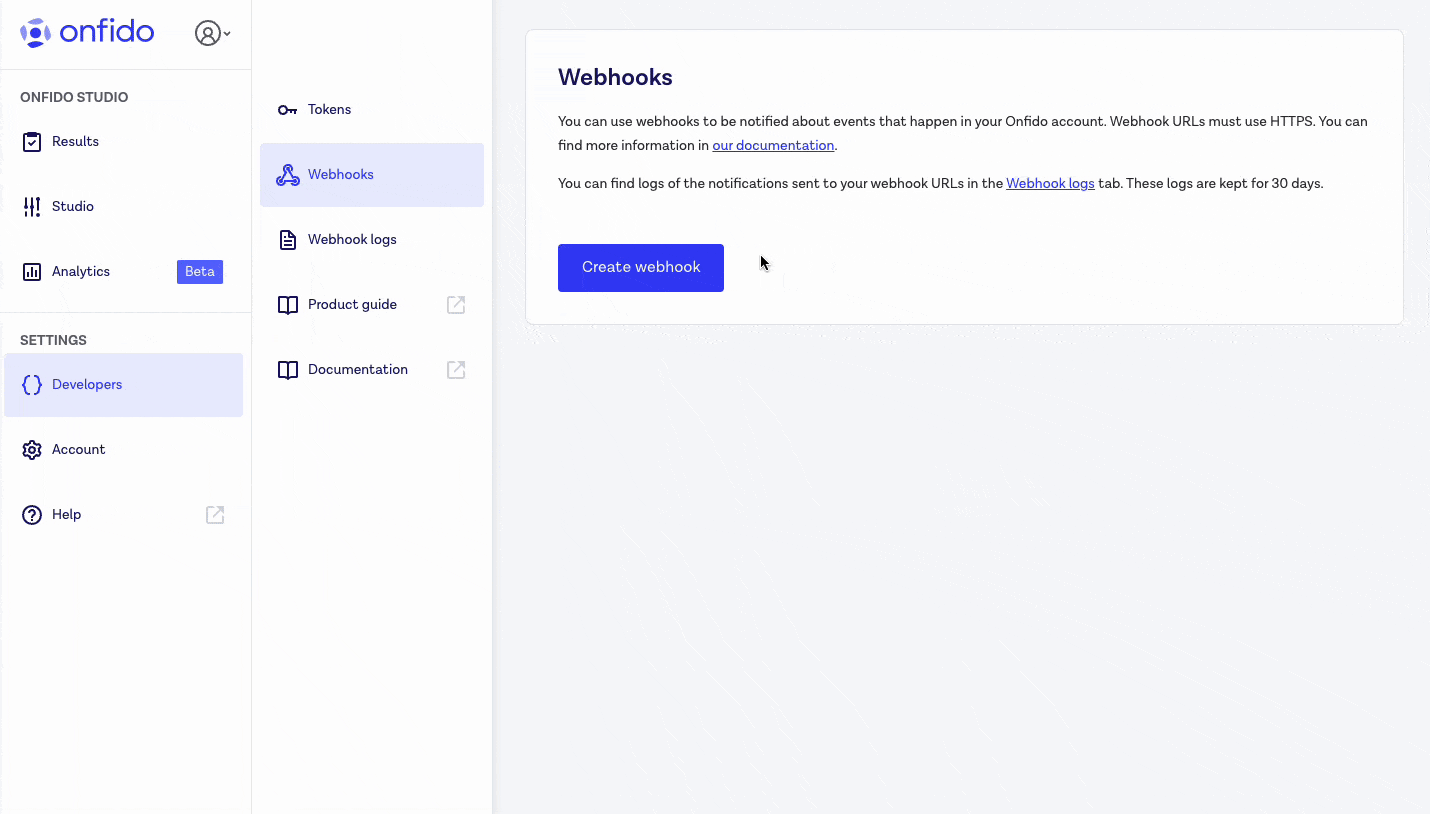
Set up your webhook
Once you have built a valid workflow and configured your Send/Receive Data tasks, you can register a webhook (via API or on your Dashboard) in order to be notified when the task is ready to execute. We recommend creating a workflow_task.started webhook, and then use the task definition ID or task definition version to filter the data in your system. The custom send properties you have configured will be made available in the payload of this webhook (you will find more details in the section below).
Sending and receiving data
The recommended method of integrating a Send/Receive Data task is to configure a workflow_task.started webhook, so you can be notified when the task is ready to execute. The payload of this webhook contains all the data inputs you have defined for your task (the custom send data described above), as well as the task definition ID and task definition version.
Once notified by our webhook, your system can acknowledge it, then run any custom processing you wish in order to produce the desired outputs. This can be done asynchronously, depending on the nature of your processing.
To pass data back into the workflow, you should invoke the Complete Task endpoint, sending the information in the data object parameter. Onfido will validate the provided data against the output schema you have defined when configuring the Send/Receive Data task. An HTTP 422 error will be returned if they do not match.
If the submission of the data is successful, the Send/Receive Data task will be completed and the workflow will proceed. All data received back into the workflow run will then be available for use in any defined Logic tasks.
Note: Even when you're not passing data back into your workflow (i.e, you don't have any receive data configured), you will still need to call the Complete Task endpoint in order complete the Send/Receive Data task.
You can configure as many Send/Receive Data tasks as you want in your workflow.
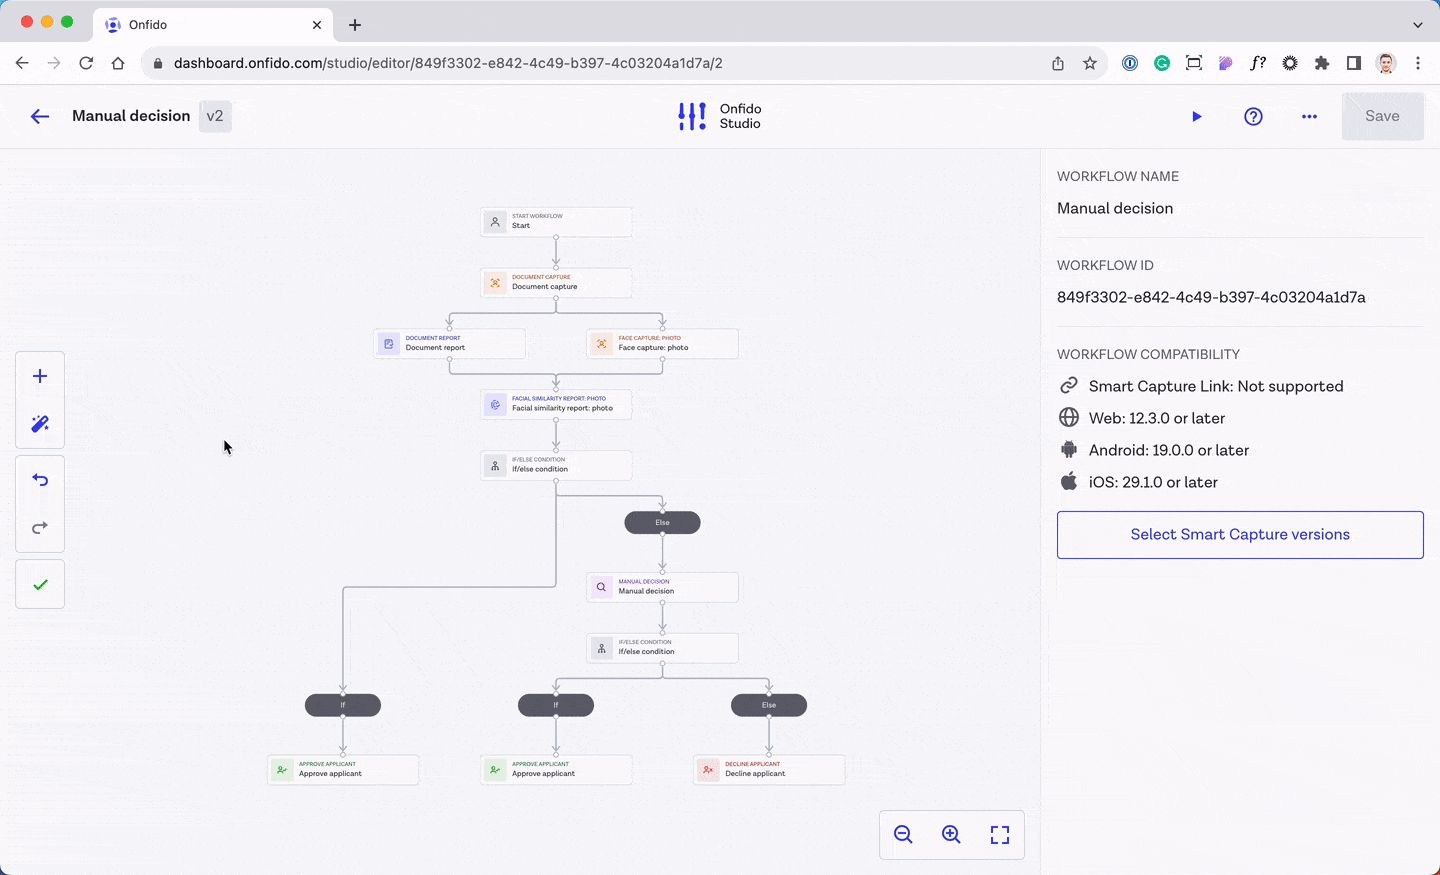
Manual Decision tasks
The Manual Decision task allows you to make manual decisions within a workflow in order to dictate the outcome of a workflow run. Some examples of a manual decision could include: Was the image quality sufficient? Was there visual fraud on the document? Do the faces match? The workflow will then use the outcome of the decision and proceed.
When a Manual Decision task is triggered during the execution of a workflow run, you can make the decision from the Workflow Results page in your Studio Dashboard.
Note: The Manual Decision task should not be used to manage and update the status of your applicants. It allows you to make a decision on an in-progress workflow run to determine its final outcome. Once the decision has been made, you are not able to change it.
For customers wanting to manually manage the status of an applicant, we recommend adopting a Case Management System (CMS) and using the outcome of a workflow run from the Retrieve Workflow Run endpoint to trigger a manual decision within that system.
To add a Manual Decision task to your workflow, simply:
- Choose the task from the task selection list and drag it into your workflow
- Configure your desired manual decision outcomes
- Add a description of the decision to be made and at least two possible outcomes
- Add an If/Else Condition task after the Manual Decision task and use the outcome to direct the customer through the next steps
Making a manual decision
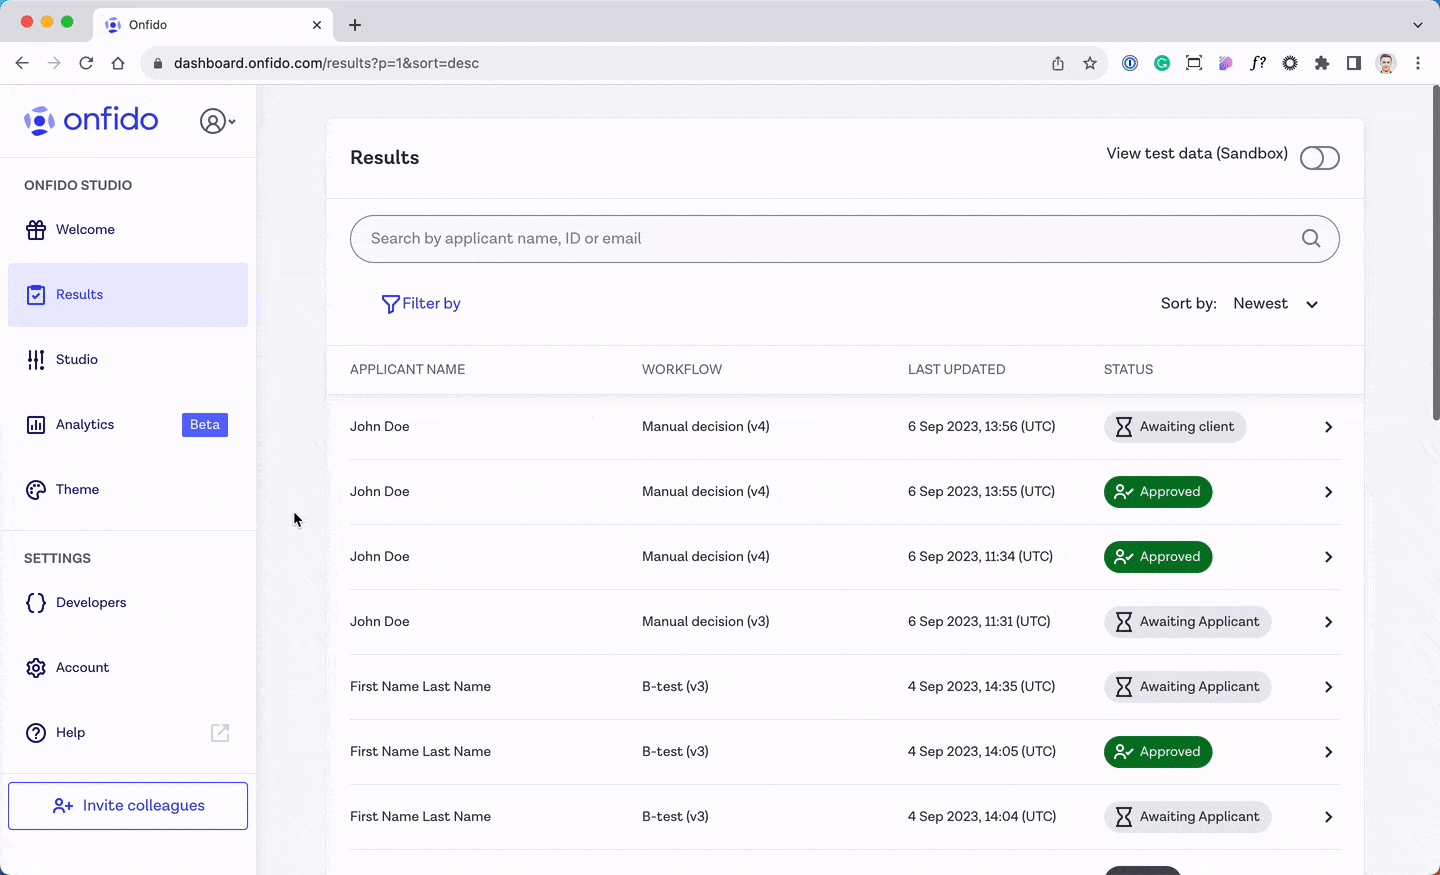
Workflow runs that require a manual decision can be found by selecting the Results tab in your Studio Dashboard, and filtering the list to view all runs or only those that require a decision.
Every workflow run that requires a manual decision will have a banner along the top.
When selecting the “Make decision” button, a modal will be displayed with the outcome options you have configured, as well as the option to add notes.
After choosing an outcome, the workflow run will continue and the information from the Manual Decision task will be displayed with other workflow run details in the Overview and Task tabs.
Notifications
To set up notifications to your team to trigger the process to make a manual decision, we recommend using our Webhooks, then generating a notification or message within your systems. Using our workflow_task.started event and listening for task_def_id = ‘manual_case_review’ will indicate when a Manual Decision Task is waiting to be reviewed in the Dashboard.
Result tasks
Result tasks represent all possible outcomes for an end user's verification journey. The three Result task types are "Approve applicant", "Review applicant" and "Decline applicant".
Generally speaking, end tasks will follow the result of a Logic task, based on the conditions and results of the reports run on your workflow. You can define as many Result tasks as you wish in a workflow. Although you can join multiple routes to a single Result task, we recommend that all individual routes have a specific outcome so you can obtain more details about how the end user reached that state.
You can define result reasons for Result tasks in the right hand configuration panel of the Workflow Builder. This helps to differentiate between Result tasks that have the same result (for example, an end user might be declined for a variety of reasons). These reasons can then be found on the results page of each workflow run in the Results section of your Dashboard, and are also returned by the API in the Workflow Run object.

Reasons can be defined for result tasks
Each Result task can also be configured to output data, based on the route that the end user took. As such, Result task output data is limited to the input data collected along the route it concludes.
You as a client will be responsible to review any workflows that end in a "Review applicant" state. Any reports that require human intervention from Onfido's team of fraud specialists will already have been completed before this stage.
Task updates
Onfido Studio allows you to update the tasks in your workflow to get the latest versions, add new functionality and apply bug fixes.
When opening the Workflow Builder, you will see a message in the bottom left corner if any of the tasks in your workflow have available updates. From here, you can choose to apply any task updates or dismiss the message. You can also access task updates at any time from the settings menu in the top right of the Workflow Builder.
Clicking "Review" on the task update message will open the task updates panel. From here, you'll see a list of all the tasks with updates available, details of the updates and what's changed, and any Smart Capture SDK/Link requirements. You can choose to update tasks individually or all at once.

The task updates panel
Task updates do not automatically get pushed live. As with any changes to a workflow, the workflow will need saving and the new version must be activated.
Workflow tags
Onfido Studio allows tags to be associated with workflow runs. These tags can then be used in the Workflow Results page of the Studio Dashboard to search for a particular subset of runs.
There are three ways to add Tags to a Workflow Run:
- With a Tag Task in the Workflow Builder
- Adding them directly in the Workflow Results page
- Via API when creating a Workflow Run
Adding a Tag task in the Workflow Builder
When building a workflow, you can use the Add Tag task to conditionally tag workflow runs which execute particular branches of the verification journey.
For example, if you have an exclusive branch for US applicants and another for applicants from all other regions, you can add the Add Tag task into that branch with a “geo:usa” tag. You’ll be able to then filter for all workflow runs with that tag on the Workflow Results page.

Adding tags when creating a workflow run
You may also need to tag verification journeys before they start. You can do this when creating a workflow run via the API by adding a tags array in the request body:
curl -X POST https://api.eu.onfido.com/v3.6/workflow_runs \
  -H 'Authorization: Token token=<YOUR_API_TOKEN>' \
  -H 'Content-Type: application/json' \
  -d '{
  "workflow_id": "<WORKFLOW_ID>",
  "applicant_id": "<APPLICANT_ID>",
  "tags": ["feature_flag:flow_2"]
}'
Adding or editing tags in the Workflow Results page
You may also need to tag workflow runs once they are completed, and after some due diligence was processed. You can do this using the Workflow Run Results page, and adding/removing tags from the tags section.

Limits and properties
Tags are free form text. Each tag has a maximum length of 128 characters.
Up to 30 tags can be added when starting a workflow run via the API. No more than 100 tags can be added to a given Workflow Run regardless of the method used to add those tags.
Recommendations
We highly recommend not to use personal Identifiable Information data in tags. While technically possible, bear in mind that URLs for pages containing the search result by a given tag will include the tag in clear text. So you may be inadvertently exposing data you shouldn’t in certain contexts.
Smart Capture version pinning
In the past, reconfiguring existing tasks or adding new tasks to an already existing workflow required that tasks be updated. The same applied when creating entirely new workflows from scratch. These updated task versions often required that customers upgrade to the latest version of the Smart Capture SDK applicable to their workflow.
This has been changed, meaning that customers can now pin or fix the Smart Capture SDK version that applies to a given workflow. Tasks can be reconfigured or added to a workflow without requiring any Smart Capture SDK update, so long as the features being used are available for the chosen Smart Capture SDK version.
To pin the Smart Capture SDK version for a Studio workflow:
- Click the button labelled “Select Smart Capture versions” in the right hand configuration panel of the Workflow Builder
- Choose which SDK you want to have a pinned version and select the version number from the dropdown list. SDK pinning is available for iOS version 28.1.0 or later, Android version 16.0.0 or later and Web version 12.0.0 or later.
- After clicking Done, a warning will appear explaining the impact of pinning the workflow to this version (more details about this in the section below)
- By clicking Continue, the selected versions will be applied and the workflow will be pinned to those SDK versions
Implications of pinning SDK versions
Pinning an SDK version to a workflow can have implications on the type of tasks that can be used, as well as the features available. Certain workflow tasks are not available on some older SDK versions, and thus cannot be added to workflows pinned to a previous SDK version. In this case, the Workflow Builder will designate these tasks as unavailable.

Certain workflow tasks are not available on some older SDK versions
Similarly, changing the pinned SDK version of an already existing workflow may impact the type and versions of the workflow tasks. Once a pinned SDK version has been applied to a workflow, Studio will validate it automatically and mark potentially invalid tasks.

Studio will mark any invalid tasks
If you're selecting an older version of any SDK and some tasks have different versions and features, the system will change them automatically in order to prevent any errors.
Please note: Onfido always strongly recommends being on the latest version of the SDK and using the latest tasks versions, to allow you to take full advantage of Studio's capabilities, features, configurations and bug fixes.
Workflow Input Data
Onfido Studio allows you to configure workflows to accept input data sent via your integration. You can select what input data you intend to include in the workflow settings menu in the upper right corner of the Workflow Builder.
Workflow input can be found in the settings menu
Input data can be passed to a workflow in one of two ways:
- Applicant input data
- Custom input data
Applicant input data
Applicant input data is sourced from an Applicant object, which must already exist in order to be used in a workflow. You can choose to input all data from the Applicant object, or select only the data fields that are relevant to the workflow. Regardless of the choice you make, it is recommended that you pass in any information that will be useful for making logic decisions in order to route end users through the appropriate flows.
Custom input data
If you have business-specific data that you want to use during your workflow, you can configure this as custom input data. The Workflow Builder allows you to customize the property names of custom data, offering a range of standard data types (string, boolean, string list, number, date time). Studio also gives you the freedom to define semantic types to annotate input data you cannot send via the applicant object, so that any task that accepts this data as input can receive it via your integration.
Note: If custom input data or applicant input data are configured, then it becomes mandatory when creating a Workflow Run. In other words, the workflow run will fail in the absence of this data.
Workflow Output Data
All data collected during a workflow can be configured as output data, returned at the conclusion of a workflow run in the (one or more) Result tasks. This information can then be retrieved via API to be used by your systems.
To do this, workflow output data must be defined in Onfido Studio. In the workflow settings menu in the upper right corner of the Workflow Builder, click on Workflow inputs / outputs, then select Workflow output from the left menu. To set up workflow output, click Add custom property. Assign all properties a name, as well as a data format by selecting from the dropdown options. To define custom output data properties, select Other from the dropdown list of format options.
To map the defined output data properties to all Result tasks in the workflow, click on the Sources tab and select data sources from the dropdown lists. Alternatively, you can map output data by clicking on any specific Result task node in the workflow, select the Output tab in the right hand configuration panel and add selected data sources from the dropdown lists.

Workflow output can be found in the settings menu
Configuring all Report data into Workflow Output
Onfido Studio also allows you to map and extract all of the output data from a full report within a workflow in a single output property. To do this, create an output property according to steps outlined above, and assign the property a name such as document_report or facial_similarity_report. Then select Other from the data format dropdown list. To map the full output data from the report (either through the Sources tab or directly in a Result task configuration panel), select the desired report tasks from the data source dropdown list and then click All Data. All output properties relevant to that report type will be returned and retrievable in the workflow results, as described below.
Depending on the complexity of your workflow, you may have several routes leading to different Result tasks. As such, you will need to configure each Result task to cater for the various outcomes.
Note: Output data sourced from workflow tasks along a specific route will only be available to Result tasks on that route. So be sure to design your workflow accordingly. Input data that has been defined as workflow input, on the other hand, can be accessed globally by all Result tasks.
Workflow Run results
Workflow run statuses
Once a Workflow Run is created, it will transition through a series of statuses, depending on where an applicant is in their verification process. These statuses can be found on your Dashboard, and are also returned as part of the resource when fetched via API using the Retrieve Workflow Run endpoint. Both methods of retrieving workflow run results are described in the sections below.
| Workflow status | Description |
|---|---|
| processing | When the workflow is processing non-interactive tasks. |
| awaiting_input | When the workflow is waiting for an applicant to complete a Smart Capture SDK interactive task (such as a document or selfie upload). Note: If your workflow has parallel tasks, awaiting_input will take precedence over processing. |
| abandoned | When an interactive task times out, the workflow will be abandoned. |
| error | The workflow ended due to a technical issue during run time. |
| approved | The workflow run reached an end task of Approve Applicant based on the workflow configuration. |
| review | The workflow run reached an end task of Review Applicant based on the workflow configuration. |
| declined | The workflow run reached an end task of Decline Applicant based on the workflow configuration. |
Retrieving workflow run results on the Dashboard
A list of the results for all workflow runs can be accessed by clicking on the Results tab in the left hand menu of your Dashboard. You can search the results list by applicant name, workflow run ID or email address, and you can filter the results list according to a range of parameters, including workflow run status, report type, etc.
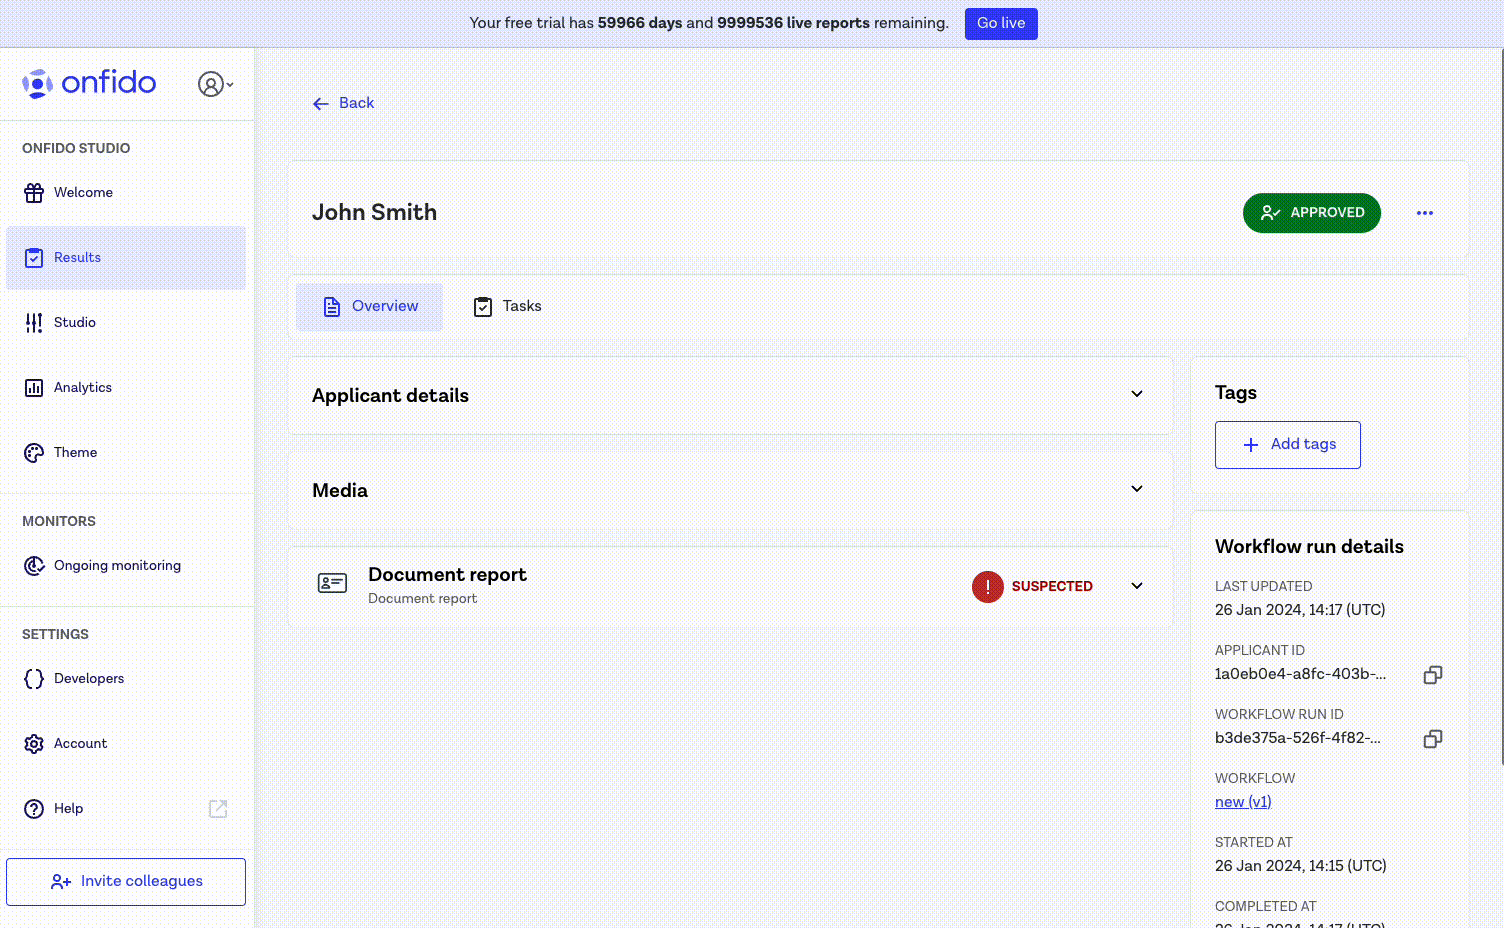
When you click on a specific workflow run result, you will find details relating to the workflow run and the applicant in question in the Overview tab, as well as Media information (such as document and selfie upload images) and complete breakdowns for all report types included in the workflow run. Any result reasons that have been configured will also be displayed here. Clicking on the Tasks tab will bring up a status list of all tasks and verifications from the workflow.
Retrieving workflow run results by API
You can fetch the outcome and status of a workflow run via the API by making a call to the Retrieve Workflow Run endpoint. Simply provide the workflow run ID as a path parameter:
curl -X GET https://api.eu.onfido.com/v3.6/workflow_runs/<WORkFLOW_RUN_ID> \
  -H 'Authorization: Token token=<YOUR_API_TOKEN>'
The Onfido service will return a Workflow Run object, where you can find all relevant result data, including the workflow run status, result reasons, as well as any configured output data:
HTTP/1.1 201 Created
Content-Type: application/json

{
  "id": "<WORKFLOW_RUN_ID>",
  "applicant_id": "<APPLICANT_ID>",
  "workflow_id": "<WORKFLOW_ID>",
  "workflow_version_id": 11,
  "status": "approved",
  "dashboard_url":"https://dashboard.onfido.com/results/<WORKFLOW_RUN_ID>"
  "output": {"prop1": "val_1", "prop2": 10},
  "reasons": ["reason_1", "reason_2"],
  "error": null,
  "created_at": "2022-06-28T15:39:42Z",
  "updated_at": "2022-07-28T15:40:42Z",
  "link": {
      "completed_redirect_url": "https://example.onfido.com",
      "expired_redirect_url": "https://example.onfido.com",
      "expires_at": "2022-10-17T14:40:50Z",
      "language": "en_US",
      "url": "https://eu.onfido.app/l/<WORKFLOW_RUN_ID>"
  },
}
The results of multiple workflow runs can also be retrieved using the List Workflow Runs endpoint. The Onfido service will return all of a customer's workflow runs, which can be filtered according to the optional status parameter.
$ curl https://api.eu.onfido.com/v3.6/workflow_runs?page=1&status=declined \
  -H 'Authorization: Token token=<YOUR_API_TOKEN>'
Export Workflow Runs in CSV format
Studio allows you to export workflow runs in a convenient .csv format, enabling you to extract and perform your own analysis of the data.
This functionality can be accessed on the Results page of your Studio Dashboard. On the top right corner, you can find the button to start exporting your workflow runs.

The .csv file will contain the 10,000 most recent rows of data, based on the filters you have applied on the workflow runs list. Searches are not applied to the exported rows.
The file will contain information about the workflow runs (such as id, state, name etc), the tasks that belong to each workflow run (such as definition id, result and sub result etc ) and the applicant who was the subject of the verification journey (such as applicant id, first name and last name etc).
Below you can find an example of how rows are formatted in the .csv file:

The .csv file may take a few moments to generate. You can keep navigating the Studio Dashboard while the file is being generated in the background. However, if you close the tab where you started the file generation, the process will be aborted.
The generation of .csv files is subject to the following limits:
- 2 file generations per minute per Dashboard user
- 10 file generations per day per Dashboard user
- 50 file generations per day across your entire account of Dashboard users
Note: The export to csv feature is only available to users with Owner or Admin access in the Studio Dashboard, due to the potential presence of Personal Identifiable Information (PII) in the exported data. The csv files should be processed and stored with the utmost care to ensure this data is protected.
Workflow Run Timeline Files
A Timeline File is an audit trail of the end-to-end IDV process performed on an Applicant through a Workflow Run, provided in PDF format.
The file includes all the Workflow Tasks performed in chronological order, the media and information captured, as well as the result and information returned.
The Timeline File is generated on demand for each Workflow Run. You can generate it using the Workflow Run results page the on Studio Dashboard, or integrating with the Onfido API.
Downloading a Timeline File from the Dashboard
The Timeline File can only be generated if the Workflow Run is in a terminal status:
AbandonedErrorApprovedReviewDeclined
Onfido applies the same data deletion policy to Timeline Files as it does to Applicants and Workflow Runs, and will store the file for the lifetime of the applicant's data.
Note: The Timeline File is not signed and must not be mistaken with the Evidence File. If you are looking to implement an ETSI certified Workflow solution, please read the documentation about the Evidence File in our product guide.